Unfindable/elbadnifnU for physical computing final
Interactive Installation | May 2022
Selected Exhibition:
2022, Interactive Installation, DDA, Pratt Institute, New York, NY
Description:
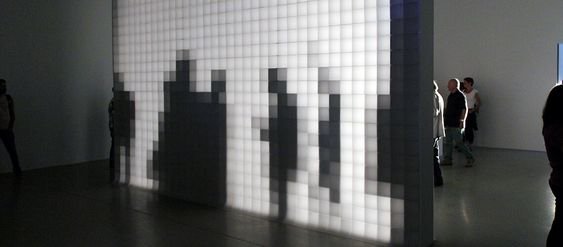
People have always been fascinated with their reflections. In visual art the mirror has been interpreted as an instrument to show admiration or self-admiration, to show hidden objects or people, demonstrated from a different perspective. The unfindable mirror is to remind people to avoid self-admiration and appearance anxiety.
Using 48 servo motors to control the rotation of mirrors, combining Mediapipe, Arduino and python.
Inspiration:


Process:
Source Code: Github Repo
Plan and Materials:
Mini Size Mirror *48
Servo Motor *48
3D Print Servo Motor Arm *48
Adafruit PCA9685 *3
Wago Splicing Connector(5) *2
Hook & Loop Tape *2
16 AWG Wire *2
5V 5A Power Supply Adapter Converter *1
Web Camera *1
Foam Board *1
Arduino UNO *1


Face Tracking Materials and Libraries:
Step1: Install Python and other libraries
The platform I am working on is a MacBook Pro running the OSX 12.
Install Python3, I would recommend installing the official 3.7 version(Python3.7 comes with a number of pre-installed external libraries, such as NumPy and OpenCV.) from the Python download website. Expand the dmg file and run the installer to install the proper Python version to the computer.
Install Mediapipe
“After we have the Python installed, the next step will be external libraries we would like to use in the Python environment. The target one is MediaPipe. We are going to use the pip command from the OSX Terminal. For general usage of the OSX Terminal, we can refer to the Terminal User Guide from Apple. For those who may have multiple Python versions installed, we can use the specific command pip3.7 to install the external libraries to make sure they are compatible with other software.” (MediaPipe in TouchDesigner)
Open Terminal and type the following
pip3.7 install --upgrade --user mediapipe
After installation, type the following to list the libraries we have
pip3.7 list

3. Install pyserial, type the following in Terminal
pip3.7 install pyserial
4. Download and install Visual Studio Code
5. Download and install Arduino IDE
6. Follow the instruction to install Adafruit PWM
Step2: Write Python and Arduino test Code
I use Face Mesh for this project, you can test the function use this code in Python below
import mediapipe as mp
import numpy as np
import cv2

cap = cv2.VideoCapture(0)

facmesh = mp.solutions.face_mesh
face = facmesh.FaceMesh(static_image_mode=True, min_tracking_confidence=0.6, min_detection_confidence=0.6)
draw = mp.solutions.drawing_utils

while True:

	_, frm = cap.read()

	rgb = cv2.cvtColor(frm, cv2.COLOR_BGR2RGB)

	op = face.process(rgb)
	if op.multi_face_landmarks:
		for i in op.multi_face_landmarks:
			print(i.landmark[0].y*480)
			draw.draw_landmarks(frm, i, facmesh.FACEMESH_CONTOURS, landmark_drawing_spec=draw.DrawingSpec(color=(0, 255, 255), circle_radius=1))


	cv2.imshow("window", frm)

	if cv2.waitKey(1) == 27:
		cap.release()
		cv2.destroyAllWindows()
		break
After you successfully running the test code, you can start combining with Arduino and single servo motor
import mediapipe as mp
import numpy as np
import cv2
import serial
import sys
import time

#Setup Communication path for arduino
arduino = serial.Serial(port='/dev/cu.usbmodem14401', baudrate=9600)
time.sleep(2) #change the port(14401) showing in your Arduino IDE
print("Connected to Arduino...")


cap = cv2.VideoCapture(0) #When you connect to web camera chage 0 to 1
cap.set(3,1280) #display size
cap.set(4,720)

facemesh = mp.solutions.face_mesh
face = facemesh.FaceMesh(static_image_mode=True, min_tracking_confidence=0.6, min_detection_confidence=0.6)
draw = mp.solutions.drawing_utils

while True:

	_, me = cap.read()

	rgb = cv2.cvtColor(me, cv2.COLOR_BGR2RGB)

	op = face.process(rgb)
	if op.multi_face_landmarks:
		for i in op.multi_face_landmarks:
			print(i.landmark[0].x*1280)
			xx = int(i.landmark[0].x*1280)
			print(xx)
			# sending data to arduino
			data = "X{0:d}YZ".format(xx)
			arduino.write(data.encode())


	cv2.imshow("window", cv2.flip(me,1)) #you can delete this if you do not want to show
	if cv2.waitKey(1) == 27:
		cap.release()
		cv2.destroyAllWindows()
		break
Connect servo motor to Arduino pin 6 and upload the code(remember to close Serial Window when running)
#include<Servo.h>


Servo servoHor; //Horizontal Servo

int x;


int prevX;


void setup()
{
  Serial.begin(9600);

  servoHor.attach(6); //Attach Horizontal Servo to Pin 6

  servoHor.write(90);
}

void Pos()
{
  if(prevX != x)
  {
    //generate map
    int servoX = map(x, 0, 1280, 10, 179);


    servoX = min(servoX, 179);
    servoX = max(servoX, 10);


    servoHor.write(servoX);

  }
}

void loop()
{
  if(Serial.available() > 0)
  {
    if(Serial.read() == 'X')
    {
      x = Serial.parseInt();
       Pos();
      }
    }
    while(Serial.available() > 0)
    {
      Serial.read();
    }
  }
Run the python code and you can see like that
Step3: Design and 3D Print the Servo Motor Arm
Thanks to aaronse, I referenced and used aaronse’s design file, you can find the STL file from the link.
Step4: Assemble and Test
Now, you may have the Arm and other materials ready, assemble them and write the new code for these 48 cute servo motors:) Here are the circuit diagram and code
Circuit Diagram:

Python Code:
import mediapipe as mp
import numpy as np
import cv2
import serial
import sys
import time

#Setup Communication path for arduino
arduino = serial.Serial(port='/dev/cu.usbmodem14401', baudrate=9600)
time.sleep(2)
print("Connected to Arduino...")


cap = cv2.VideoCapture(0)
cap.set(3,1280)
cap.set(4,720)

facemesh = mp.solutions.face_mesh
face = facemesh.FaceMesh(static_image_mode=True, min_tracking_confidence=0.6, min_detection_confidence=0.6)
draw = mp.solutions.drawing_utils

while True:

	_, me = cap.read()

	rgb = cv2.cvtColor(me, cv2.COLOR_BGR2RGB)

	op = face.process(rgb)
	if op.multi_face_landmarks:
		for i in op.multi_face_landmarks:
			print(i.landmark[0].x*1280)
			xx = int(i.landmark[0].x*1280)
			print(xx)
			# sending data to arduino
			data = "X{0:d}YZ".format(xx)
			arduino.write(data.encode())


	cv2.imshow("window", cv2.flip(me,1))

	if cv2.waitKey(1) == 27:
		cap.release()
		cv2.destroyAllWindows()
		break
Arduino Code:
#include<Servo.h>
#include <Adafruit_PWMServoDriver.h>


//define min/max pluse length count
#define SERVOMIN 240
#define SERVOMAX 440
#define SERVO_FREQ 60

// called this way, it uses the default address 0x40
Adafruit_PWMServoDriver pwm1 = Adafruit_PWMServoDriver(0x42);
Adafruit_PWMServoDriver pwm2 = Adafruit_PWMServoDriver(0x41);
Adafruit_PWMServoDriver pwm3 = Adafruit_PWMServoDriver(0x40);

Servo servoHor;
int x;
int prevX;

uint8_t servonum = 0;


void setup(){
  Serial.begin(9600);
  //Serial.println("16 Servo follow test");

  //pwm setup
  pwm1.begin();
  pwm1.setPWMFreq(SERVO_FREQ);

  pwm2.begin();
  pwm2.setPWMFreq(SERVO_FREQ);

  pwm3.begin();
  pwm3.setPWMFreq(SERVO_FREQ);
  servoHor.write(90);


  }


void loop(){
  if(Serial.available() > 0){
    if(Serial.read() == 'X'){
      for(int i = 0; i < 16; i ++){
      int x = Serial.parseInt();
      int p = map(x,0,1280,SERVOMIN,SERVOMAX);
      //p = min(p,SERVOMAX);
      //p = max(p,SERVOMIN);
      if(x < 440 && x > 260){
        pwm1.setPWM(i,0,SERVOMIN);
        pwm3.setPWM(i,0,SERVOMAX);
        if(i < 8){
            pwm2.setPWM(i,0,SERVOMIN);
        }else if(i < 16 && i > 7){
            pwm2.setPWM(i,0,SERVOMAX);
          }
        }else{
      pwm1.setPWM(i,0,p);
      //delay(50);
      pwm2.setPWM(i,0,p);
      //delay(50);
      pwm3.setPWM(i,0,p);
        }
      }
    }
    while(Serial.available() > 0){
      Serial.read();
      }
  }
}
Step5: Connect Mirrors and Arms
Please remember to calculate the distance of each mirror or you will have lots of trouble when you run the program like me!!


Reference:
https://learn.adafruit.com/16-channel-pwm-servo-driver
https://github.com/aaronse/ServoPixelDisplay
https://github.com/julienp17/WaveMirror
https://www.youtube.com/watch?v=bal2STaoQ1M&t=0s
https://google.github.io/mediapipe/
https://www.learnrobotics.org/blog/face-tracking-opencv/
https://www.youtube.com/watch?v=kV8v2GKC8WA&t=240s